Say Hello to Symphony
In this "Hello World" follow-up, we build out a full-featured site, with front-end submission, an RSS feed, Twitter integration, and more.
Step 2. Create a Master Layout Utility
Most content-managed websites have a master template, a common XHTML wrapper within which each page's specific contents are displayed. In this step, we'll use Utilities to create a master layout of our own, which we'll include on all our pages. We'll also add a helpful date formatting utility that we can call sitewide whenever we need to format a date.
2.1. Create Your Master Utility
Go to Blueprints > Utilities and in the top right click the green Create New button. You'll see Symphony's utility editor.
Author's Note: From Symphony 2.4, xsl editing in the admin has been removed. You can edit templates in your favourite code editor, or there are a couple of unofficial extensions available.
In the Name field, enter master.xsl. In the Body, we'll need to do a few things...
First, since this utility is going to be responsible for building every page's XHTML head, we need to set our output options. Between the <xsl:stylesheet> opening tag and the <xsl:template> opening tag, add the following:
<xsl:output method="xml"
    doctype-public="-W3CDTD XHTML 1.0 Strict//EN"
    doctype-system="http://www.w3.org/TR/xhtml1/DTD/xhtml1-strict.dtd"
    omit-xml-declaration="yes"
    encoding="UTF-8"
    indent="yes" />
This will set our pages' doctype, content-type and so forth.
Next, change <xsl:template name=""> to <xsl:template match="/">. That changes our template from one that needs to be called by name to one that will apply itself to the XML root of each page.
Now, inside the <xsl:template match="/"> element, let's add the shell of our layout:
<html>
<head>
<meta http-equiv="Content-Type" content="text/html; charset=UTF-8" />
<title>Hello World!</title>
<link href="{$workspace}/styles/main.css" rel="stylesheet" type="text/css" />
</head>
<body>
<div id="layout">
<h1>Symphony Greets the World</h1>
<h5 id="powered"><a href="http://www.getsymphony.com"><span>♫</span>A Symphony Site</a></h5>
<xsl:apply-templates />
</div>
</body>
</html>
Here's the full code. When our pages are built, this template will be invoked first because it matches our XML's root. It will create the simple XHTML structure you see here, and then use the generic <xsl:apply-templates /> to apply page-specific template rules within that structure.
You'll notice that we referenced a CSS file in the head. It's attached here in .ZIP format. Download it, extract it, and drop main.css into your Symphony workspace folder at /workspace/styles. (The styles folder doesn't exist, so create it).
You'll also notice some interesting syntax in the path we used to include the CSS. Because the location of your workspace folder is available as a system parameter, we can reference it in the href attribute using XPath's attribute value template, like this: {$workspace}. XPath will evaluate this expression and replace it with the actual path stored in the parameter.
2.2. Update Your Page Template
Now let's update the home page template to accommodate your new master layout utility. Go to Blueprints > Pages, and click "home.xsl". The first thing we need to to is include the utility we've just created. Before any <xsl:template> declarations, add:
<xsl:include href="../utilities/master.xsl"/>
We'll need do that for every page that will use our master layout. We no longer need the <xsl:output> element because our master utility is taking care of that, so let's delete it.
Change <xsl:template match="/"> to <xsl:template match="data">. You'll recall that above we had the master utility match the XML root element, /. Here, we tell the page's template to match the next element in the XML hierarchy, <data>. This ensures that our rules will cascade correctly, from the universal master utility down to our specific page template.
Empty the template's content, leaving only:
<xsl:template match="data">
</xsl:template>
Now, what we want to do in this template is render this page's specific content. Go to http://your-site.com/?debug and review the page's XML source. The content we've got is a list of Greetings, so let's create the markup for a greetings list. Add the following inside <xsl:template match="data">:
<ul id="greetings-list" class="content">
    <xsl:apply-templates select="greetings/entry"/>
</ul>
We already have a template for each individual greeting entry. Let's update it to accommodate our new content structure:
<xsl:template match="greetings/entry">
    <li>
        <h3><xsl:value-of select="greeting-title"/></h3>
        <ul class="meta">
            <li class="date"><xsl:value-of select="date"/></li>
            <li class="language"><xsl:value-of select="language"/></li>
        </ul>
        <xsl:copy-of select="greeting-content/node()"/>
    </li>
</xsl:template>
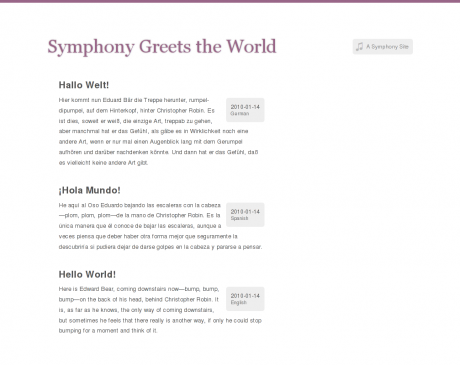
Your final page template should look like this. Now if you go to your front end, you'll see we've managed to pull our updated content into this new page layout:
Nice work. Your keen eye will notice, though, that the dates on our home page aren't in the most friendly format. Utilities can help us here too. We'll use Allen Chang's handy date formatting utility to take care of this.
2.3. Create A Helper Utility for Formatting Dates
Go to Blueprints > Utilities and click the Create New button. In the Name field, enter date-time.xsl. In the Body, paste in this XSLT stylesheet (replacing what's there). Click the Create button to save the new utility.
Now, let's include it from our master template, so that we can call it sitewide whenever we need to. In the Utilities list on the right side of the screen, click "master.xsl". In the master utility, after the <xsl:output> element and before the <xsl:template> element, paste:
<xsl:include href="date-time.xsl"/>
This will make the date formatting template available to all pages that use our master layout.
Now let's prettify those dates on the home page. Go back to the home page template (Blueprints > Pages and click "home.xsl"), and replace this line:
<li class="date"><xsl:value-of select="date"/></li>
With this:
<li class="date">
    <xsl:call-template name="format-date">
        <xsl:with-param name="date" select="date"/>
        <xsl:with-param name="format" select="'x M Y'"/>
    </xsl:call-template>
</li>
Here, instead of just spitting out the text value of the date node, we're calling a named template, format-date, from the "date-time.xsl" utility we've just added. We pass it the greeting's date node and a format string as parameters, and it formats our date for us. Now go back to your home page and you should see much nicer dates.

