Say Hello to Symphony
In this "Hello World" follow-up, we build out a full-featured site, with front-end submission, an RSS feed, Twitter integration, and more.
Step 3. Add a Dynamic Navigation Menu
Your site will need a simple navigation menu to allow visitors to browse around the various pages we'll be creating. Building one manually would be a pain, but luckily Symphony has a special type of data source built-in for just this task. A navigation data source queries your project's page structure, and we can use that XML to build our menu.
3.1. Rename Your Existing Home Page
Before we start, let's change our existing page's title to something a little more descriptive. Go to Blueprints > Pages and click "Home". In the Title field, enter View Greetings. Don't worry about changing the URL Handle field because this is our index page and it's available at our site root. Click Save Changes.
3.2. Create a Navigation Data Source and Attach it to your Page
Creating our navigation data source is simple. Go to Blueprints > Data Sources, and click the green Create New button. In the Name field, enter Navigation and from the Source dropdown, choose "Navigation". You can leave the filtering and other options alone. Click Create Data Source.
Now, in order to access the navigation data in our templates, we'll need to attach the data source to our page. Go to Blueprints > Pages, click "View Greetings," and in the page editor select "Navigation" in the Data Sources multiselect at the bottom right. Do not deselect the "Greetings" data source; both "Greetings" and "Navigation" should be selected. Click Save Changes.
3.3 Add the Menu to Your Master Layout
Go back to your front end and access the debug interface: http://your-site.com?debug. Scroll down. You should see the output from our new navigation data source in your page's XML:
<navigation>
    <page handle="home" id="1">
        <name>View Greetings</name>
        <types>
            <type>index</type>
        </types>
    </page>
</navigation>
Now we've got a list of our pages—perfect for building a menu.
Go back to your master layout (Blueprints > Utilities and click "master.xsl"). Add the following just above <xsl:apply-templates />:
<xsl:apply-templates select="data/navigation"/>
This will cause our menu will be rendered, sitewide, just above any page-specific content. Now let's write the templates for it. Below our existing <xsl:template>, add a new one:
<xsl:template match="navigation">
    <ul id="nav">
        <xsl:apply-templates select="page"/>
    </ul>
</xsl:template>
This template is going to match our XML's navigation node and create an unordered list. Then it'll apply templates to each page element found inside of navigation.
Let's add the template for the page nodes:
<xsl:template match="navigation/page">
    <li>
        <a>
            <xsl:choose>
                <xsl:when test="types/type = 'index'">
                    <xsl:attribute name="href"><xsl:value-of select="$root"/>/</xsl:attribute>
                </xsl:when>
                <xsl:otherwise>
                    <xsl:attribute name="href"><xsl:value-of select="$root"/>/<xsl:value-of select="@handle"/></xsl:attribute>
                </xsl:otherwise>
            </xsl:choose>
            <xsl:if test="@handle = $current-page">
                <xsl:attribute name="class">current</xsl:attribute>
            </xsl:if>
            <xsl:value-of select="name"/>
        </a>
    </li>
</xsl:template>
This template builds each menu item. Let's quickly walk through what's going on here. A menu item will consist of a list item, <li>, with an anchor, <a>, nested inside. In the anchor element, we've included a bit of logic:
- First, an
<xsl:choose>(which works likeif ... else) helps us build the menu links. When applied to the index page, the template sets thehrefto just the site's root URL (using$root, a system parameter). Otherwise, it appends the page'shandleattribute to the root URL to form thehref. - After that, an
<xsl:if>tests if the page it's templating is actually the page we're currently on ($current-page, another system parameter). If so, it adds aclass="current"attribute to the anchor. - Finally, it uses the page's name for the anchor's text.
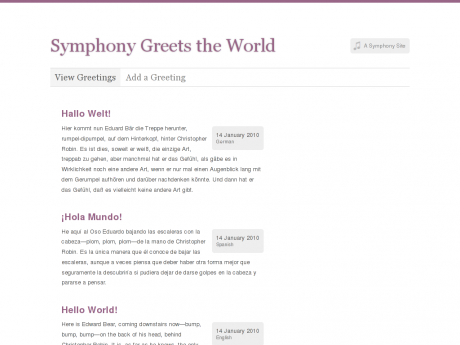
That's all we need to do. Save your changes, and visit your front end. You should see the new menu in your layout.
3.4. Test Your New Menu
Let's add a second page to make sure all this is working. Go to Blueprints > Pages and click the green Create New button. Title your new page Add a Greeting, and give it a URL Handle of add. In the Data Sources multiselect, select "Navigation". Leave the remainder of the fields untouched. Click Create Page.
Now, if you revisit your front end, you should see the new page in your menu:
If you click "Add a Greeting," you'll get an XSLT error. Don't worry about that for now. It just means we haven't set up that page's template yet. We'll come back to that in Step 6. First, let's work on creating a view for individual greetings.

